
While I love how leather soles look, and how they feel under my feet as I walk, I hate that after a few months, they start to look beat up… anything from basic scuffs to uneven heel wear and tear.
Not to mention, in the winter, it’s much easier to slip and slide all over an icy sidewalk in smooth leather soles than grippy rubber ones.
The following is a guest article from Spencer over at Half Soles. I think sole protectors are an interesting option for those who want to extend the life of their soles without applying anything too permanent to their dress shoes or boots.
***
First off, why sole protectors at all?
 Leather soles are the standard when it comes to most quality footwear. However, the classic elegance of leather soles is great for indoors, but not always so practical for outdoors.
If you walk much on pavement, you’re likely to grind through your leather soles in 4-6 months, like this guy or this guy.
Sole protectors, like Vibram half soles or Topys, are a great option for those looking to add a bit of durability and grip.
Let’s evaluate the general pros and cons of sole protectors, taking into consideration multiple factors.
The Pros and Cons of Sole Protectors
Style
- Con – Naked leather looks better.
- Pro – A commando tread can add a manly touch.
Some things are better left alone, and beautiful leather soles are apt to feel like one of those things.
Believe me, defiling these beauties with 60 grit sandpaper was not easy. But, I knew they wouldn’t look shiny forever.
Sure, they’re picturesque when new, but then, they’re used. The soles get scuffed and scraped. The stitching gets chewed away.
Here’s an older pair that I added half soles to – the style tradeoff isn’t quite so bleak when comparing to worn leather soles.
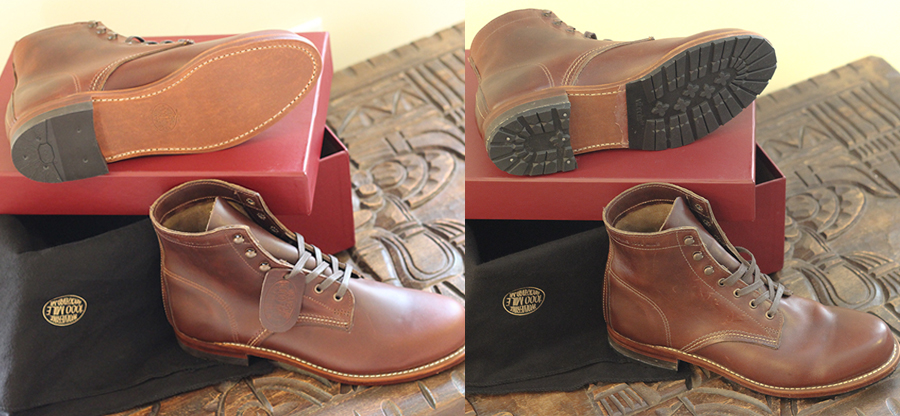
Here’s my pair of Wolverine 1000 Mile boots with a lug half sole – personally, I prefer the more rugged look with the half sole.
Comfort
- Con – A bit heavier and stiffer.
- Pro – Preserve your break in.
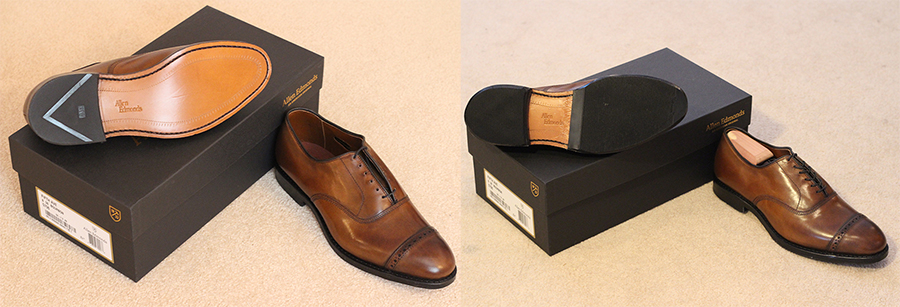
Adding half soles and heels to my Allen Edmonds added about 2.5 ounces (70 grams) to each shoe. Adding half soles and heels to my Wolverine boots added about 4 ounces (110 grams) to each boot.
But, I really don’t notice the added weight and stiffness when they’re on my feet.
On the upside, preserving the leather soles means preserving the break in. A resole means a new break in. A new leather sole to flex. A new cork bed to mold.
All of your beautiful break in stays when you peel off your worn half sole and stick on a new one.
Durability
- Con – None!
- Pro – Preserving your sole preserves your entire shoe.
Even recraftable shoes can only be resoled so many times. A cobbler using a rapid machine for Goodyear welt stitching can do 2-3 resoles before the welt starts to fall apart.
If the manufacturer resoles the shoe, they can do a more complete reconstruction and get 4-6 resoles in before the insole starts to give up.
Sole protectors save your soles, and thus also your welts and general shoe construction. You can peel off the worn half sole and stick on a new one as many times as you’d like.
The half soles on my Wolverines are going on 10 months, with lots of life left in them still.
Grip
- Con – None (again)!
- Pro – Address your needs, from low profile to chunky tread.
Leather glides nicely along on dance floors and office rooms, but it’s scary on snow and ice. If you occasionally tear out your crotch on walks to your car, sole protectors might be for you.
I use the Vibram dress half soles on my Allen Edmonds. The thin sole and minimalistic tread pattern maintain a more formal profile, but still feel stable on snowy and rainy sidewalks.
I use the Vibram lug half soles on my Wolverine 1000 Mile boots. Their grip is more solid for rock, dirt, rain and snow, and the thicker rubber sole adds a nice cushioning. And I love the look of the classic commando tread.
Convenience
- Con – Working on your own shoes.
- Pro – Working on your own shoes.
Working on your shoes is inconvenient, but so is waiting a week for your shoes from your cobbler.
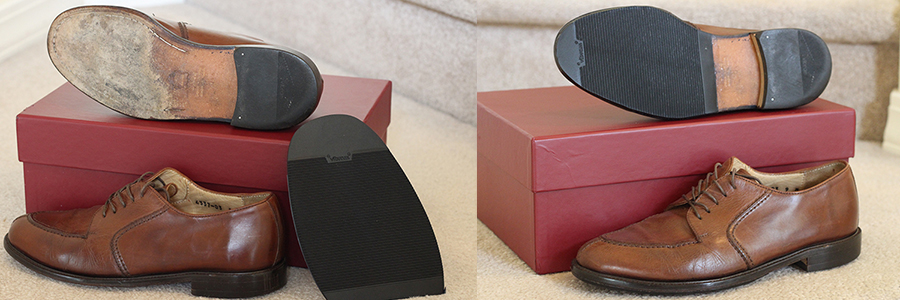
When my sole protectors have worn through, I peel off the old and slap on the new. It takes me about 20 minutes. It’s a forgiving process and easy to do. The glue is dry and ready to run by morning.
Also, don’t underestimate the inconvenience of miscommunication.
There are many horror stories of ruined shoes by cobblers who misunderstood their customer’s wishes. Language barriers with the guy who’s going to cut and stain your shoes can be very inconvenient.
Cost
- Con – A wash if a cobbler does it for you.
- Pro – I do my own. A $10 pair lasts me 12-18 months.
The cobbler near me wanted $65 to put on half soles and heel lifts, and $90 to do a resole. I’d be better off getting a new pair of shoes from JCPenney every year.
Therefore, I do my own half soles (and will teach you to do the same below). A $10 pair lasts me 12-18 months. The $30 quart can of Barge All Purpose Cement I use is good for 20 to 25 pairs. The glue stores well for extended periods of time, so you don’t have to worry about using it all at once.
How to Glue Your Own Sole Protectors
Alright, we’re getting to the nitty gritty. Hopefully I’ve convinced you to at least give the half soles a try. And if you’re on the same page, you’re going to want to know how to apply them correctly.
Materials and Tools Needed
- Half soles
- Sandpaper
- Rubber cement
- String/cord/rope
- Trimming knife
Step 1: Prepare the Bonding Surfaces
- Position the half sole as desired. Leave extra on all sides to get a clean trim at step 4.
- Mark the bottom edge of the half sole onto the sole using a pen. This line will serve as a guide for applying the glue to the sole and for positioning the half sole at step 3.
- Roughen the bonding surfaces of the sole and the half sole. The glue needs a texture to grab onto. Sixty grit sandpaper worked well for my Allen Edmonds, but not for my Wolverines. Get creative. For my Wolverines the back end of my crescent wrench worked well.
- Clean the bonding surfaces with a dry cloth.
Step 2: Apply the Rubber Cement
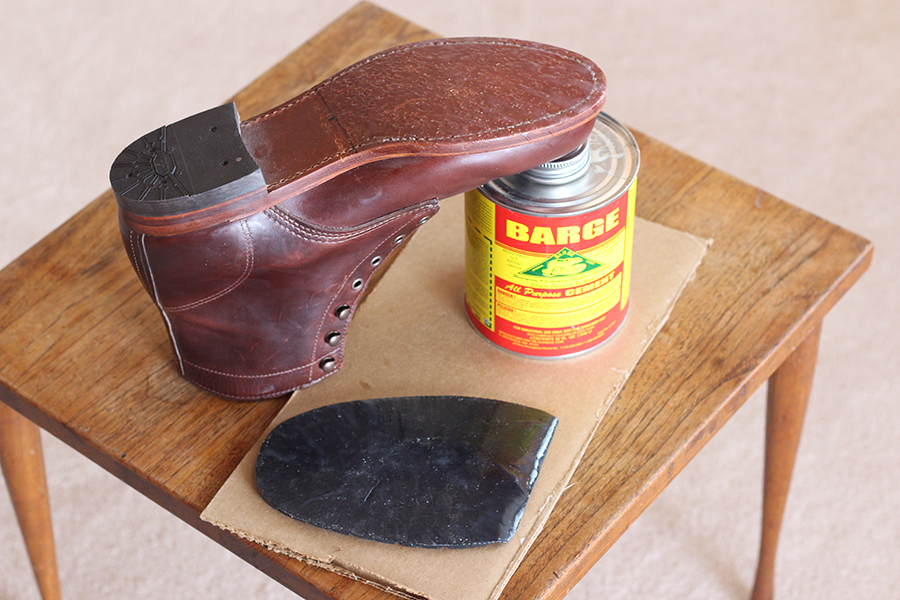
- Apply a thin, uniform layer of glue to both bonding surfaces. Cover the surfaces all the way to the edges. I like to go a bit past the marked line to make sure I get a good bond all the way to the bottom edge. The extra glue can be peeled off later.
- Let the glue dry for 10-15 minutes.
- Apply a second coat, covering the spots that might be sparse.
- Let the glue dry for about 20 minutes. You’ll know it’s ready when the glue is tacky to the touch, but does not come off onto your finger.
Step 3: Bond the Half Sole
- Carefully position the half sole to the line you marked on the leather sole in step 1.
- Starting at the marked line, press the half sole onto the sole. Roll the half sole onto the sole from the bottom edge up toward the toe as you go, being careful to not trap any bubbles.
- Firmly press the half sole onto the sole for a tight bond. Really press it. The center, and all around the perimeter. You can grunt. This is a man’s work.
- Pound the half sole on with a hammer.
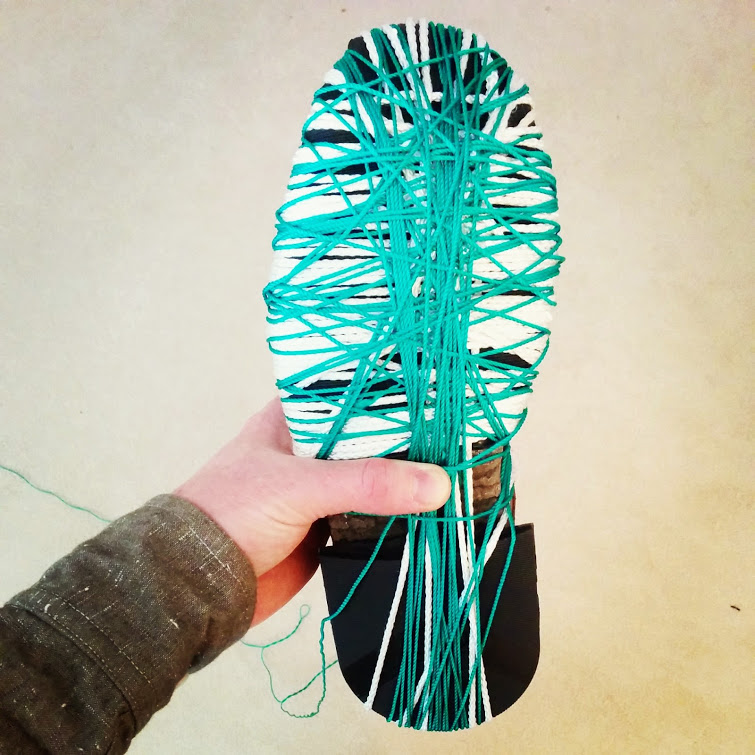
- Tightly wrap the half sole to the sole using a string. Inserting shoe trees helps the shoe keep it’s shape, and laying a folded rag on top of the shoe protects the leather and gives the string something to hook onto while wrapping.
- Let the glue cure for at least 3 hours.
Step 4: Trim the Half Sole
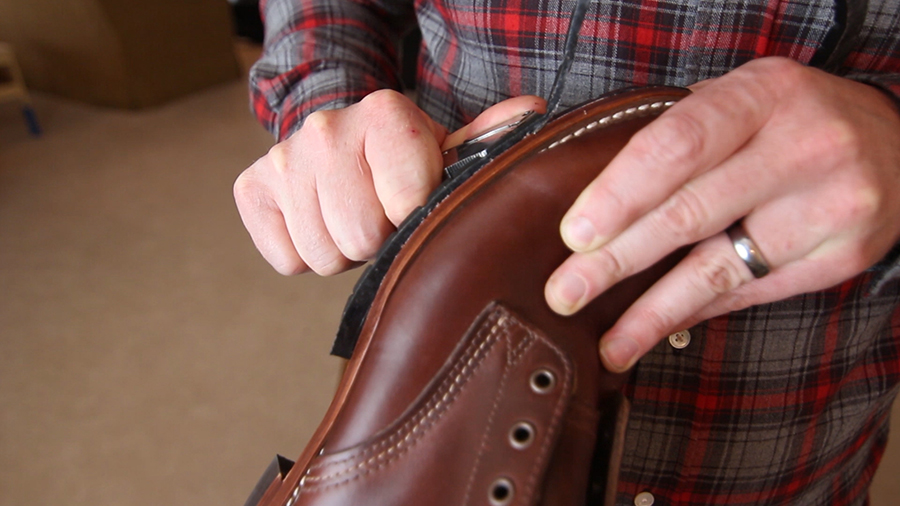
- Use a smooth, continuous cut to trim around the perimeter of the half sole. Avoid rocking the blade to minimize visible cut lines.
- Tilt the blade inward as you trim to give the edge a beveled angle for a cleaner look.
- Let the glue cure for at least 12 hours before wearing.
So, are rubber sole protectors for you?
Well, like anything else you wear, it’s a matter of personal preference. There are advantages and disadvantages. You’ll just have to decide what you want.
For me, I like the practicality, and I like having a project to work with my hands.
TELL ME
Thanks, Spencer! Now, Gents, I must know…
Are sole protectors something you would consider trying? Why or why not?
Have you tried them before, and if so, what were the results?
Would love to hear about it in the comments below.
images via halfsoles.com